Gantt Views
CreataCRM has several Gantt views
An Example Project
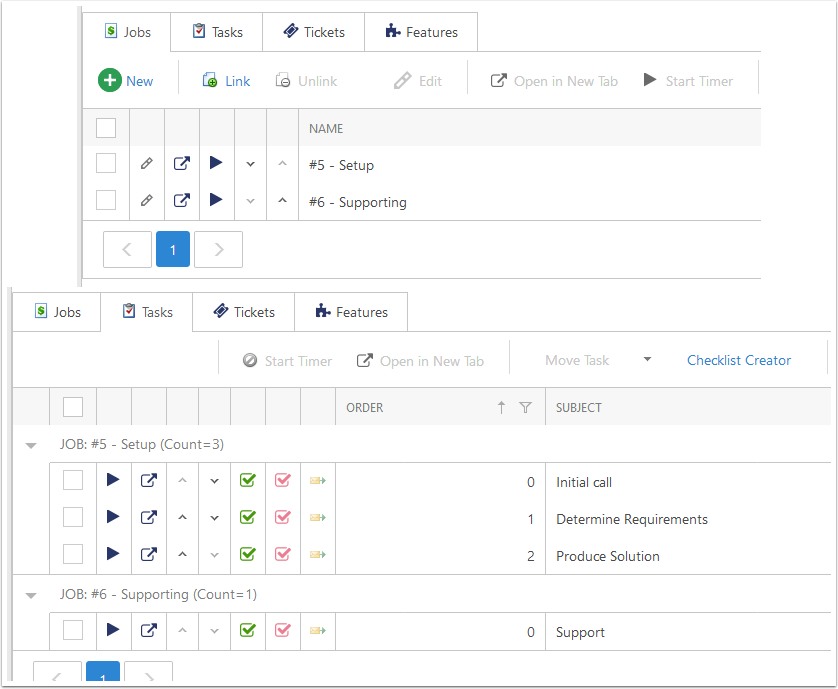
For this document, an example project will be used. This project has two Jobs linked to it, each of which has their own Tasks set up in turn.
A Project was used as the Gantt for Projects has all features - other Gantt views (for example, the Job Template Gantt view) do not have all of their features enabled.
The Gantt View
CreataCRM has several Gantt views, which provide an overview based on information in the detail view.
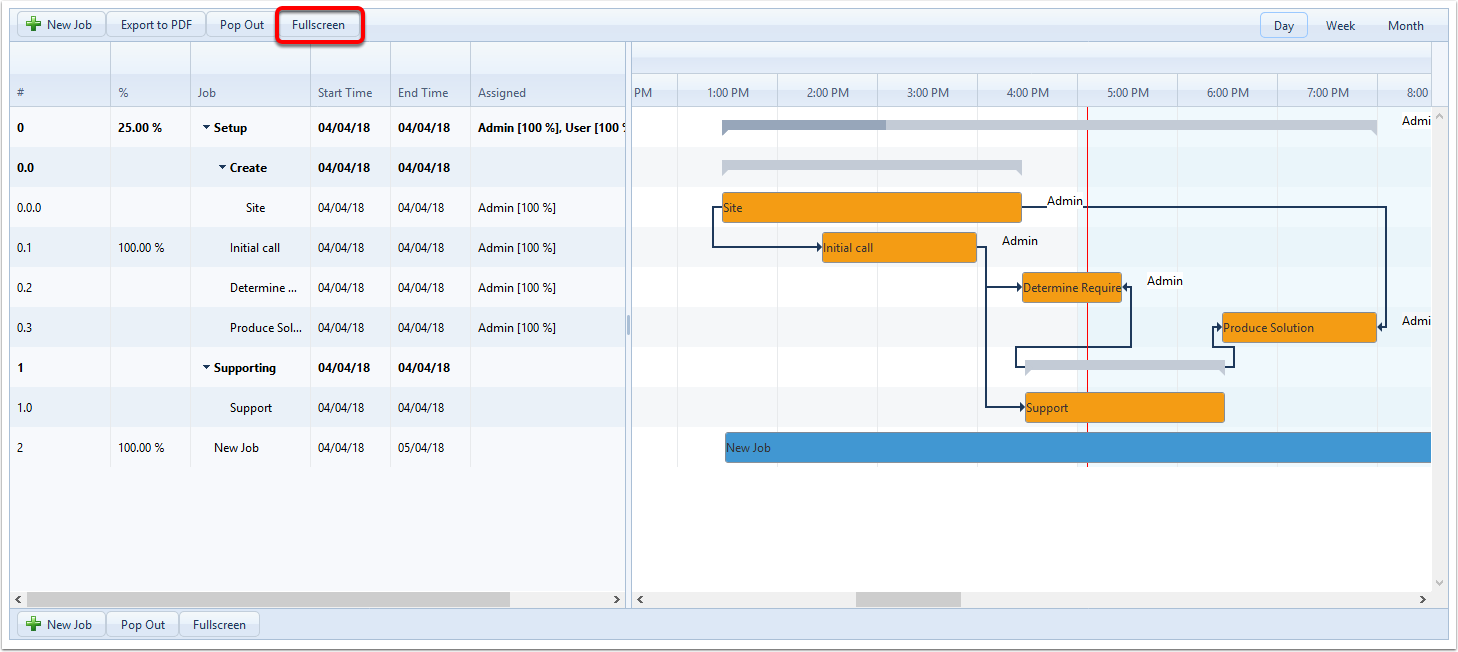
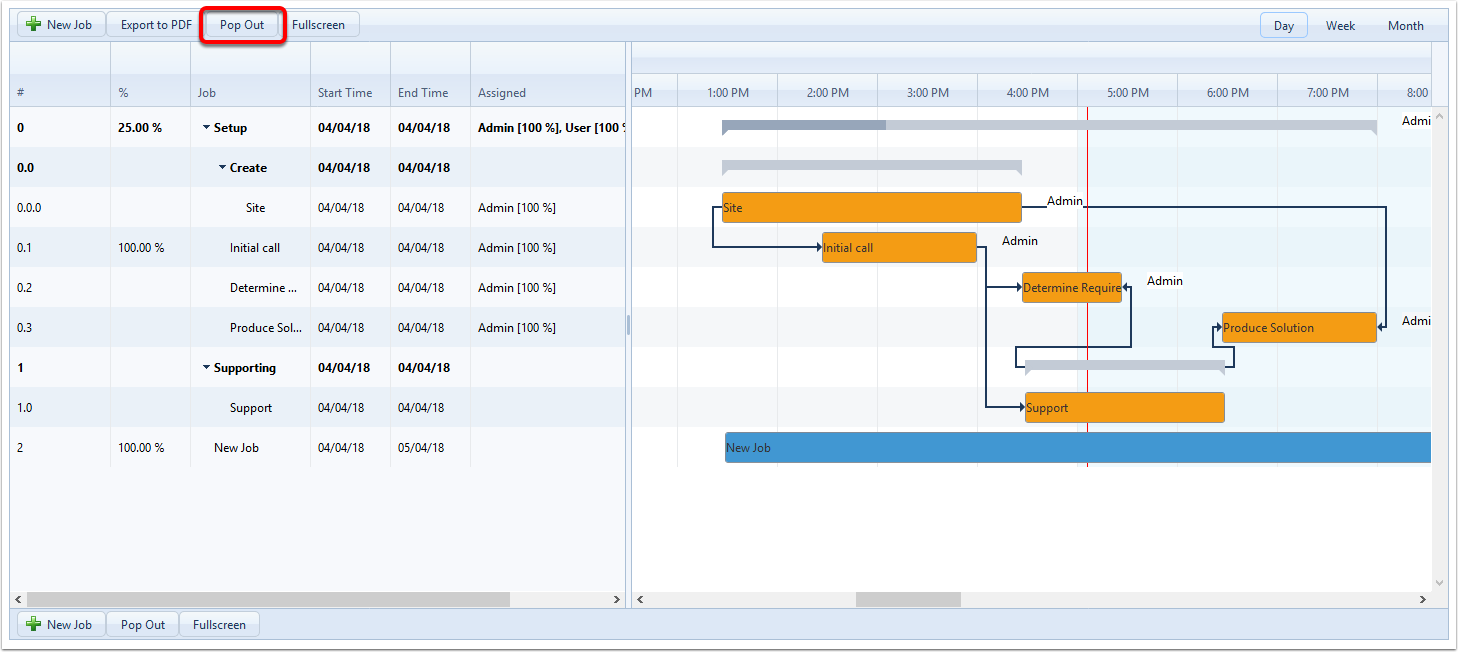
As an example, the Project Detail View's Gantt is shown below. The Jobs for this Project, as well as the Tasks for each Job, are shown in the list on the left and depicted visually in the chart on the right, based on their Start and End times.

The Job & Task List
The pane on the left shows a list of each job, with that Job's Tasks listed underneath them.
The columns visible in this view are:
- A unique identifier for each job and sub-task. Job 0 is the first Job for the project, while Task 0.0 is the first sub-task under Job 0.
- % - The percentage completed of each Job and Task. As Tasks are completed, their completion is marked and the Job's completion percentage also increases based on the number of sub-tasks it has.
- Job - The Name given to the Job or Task.
- Start Time - The Date on which the Job or Task is scheduled to start.
- End Time - The Date on which the Job or Task is scheduled to end.
- Assigned - The Users assigned to do the Job or Task. There may be multiple users assigned to each Job or Task.
- Allocated Time - The time allocated to perform the Job or Task.
Editing the Column Values
By double-clicking on any column except for the "#" and "%" columns, you can change the value in that column. Below we are changing the name of the "Initial call" Task

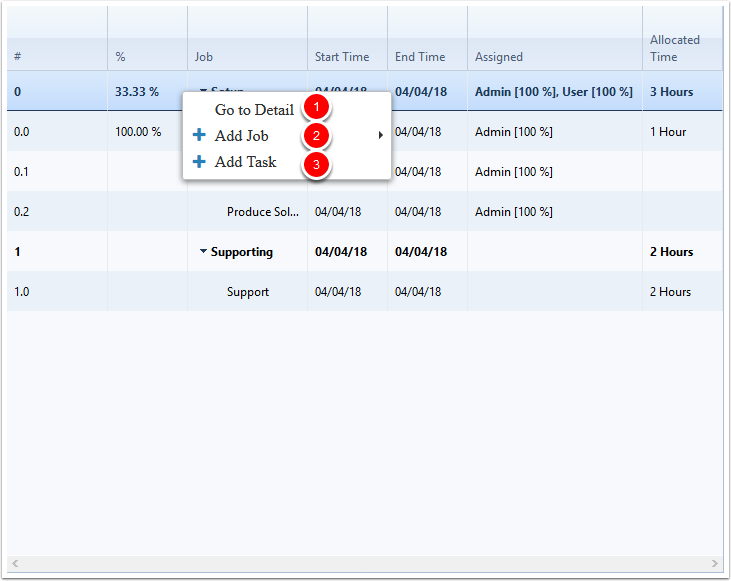
The Right-Click Menu - Job
By right-clicking a Job, you'll be presented with the following menu.
The options on this menu are:
- Go To Detail - This will take you to the detail view for the Job that was clicked on.
- Add Job - this will provide the option of creating a new Job on the project, either above or below the current job in terms of order, or creating a new Child Job of the Job that was clicked on.
- Add Task - this will create a new Task for the Job that was clicked on.
The Right-Click Menu - Job 2
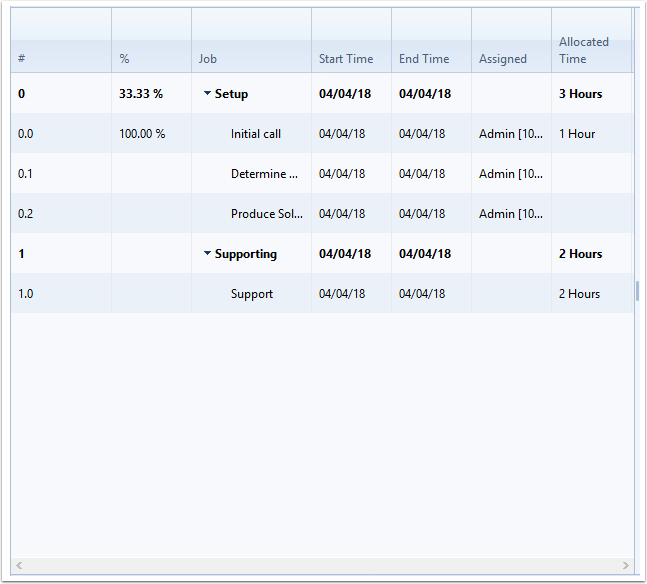
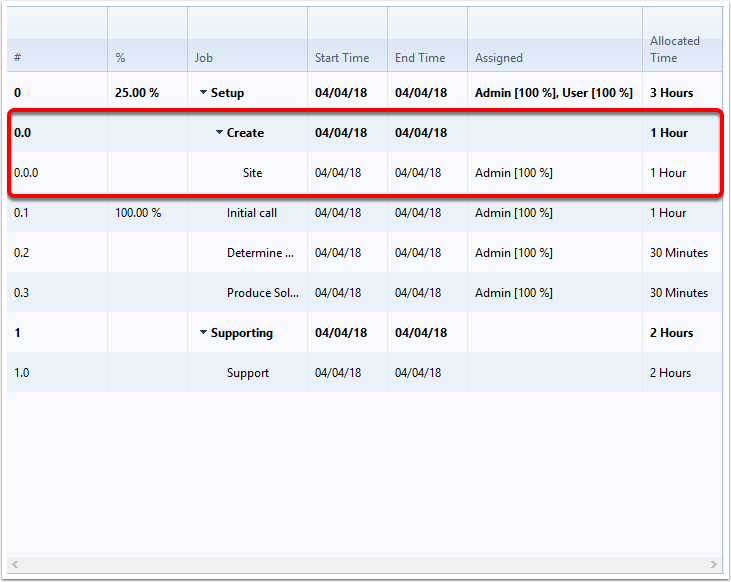
We've created a new Child Job for the Setup job in this project, which has been renamed to Create. We have also added a new Task to that job, called Site. We've also set up the Allocated Time for the Job and the Task, and the Assigned User for the Task.
Notice that the "%" column for the Setup job has decreased to 25.00% - this is because it is now taking the new Job into account when working out its completion percentage.
The Right-Click Menu - Task
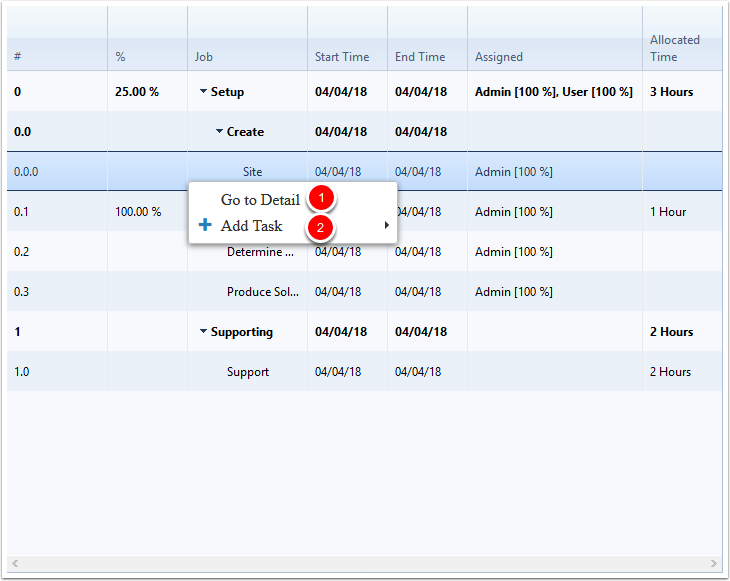
By right-clicking a Task, you'll be presented with the following menu.
The options on this menu are:
- Go To Detail - This will take you to the detail view for the Task that was clicked on.
- Add Task - This will provide the option of creating a new Task on the job, either above or below the current task in terms of order.
Clicking & Dragging
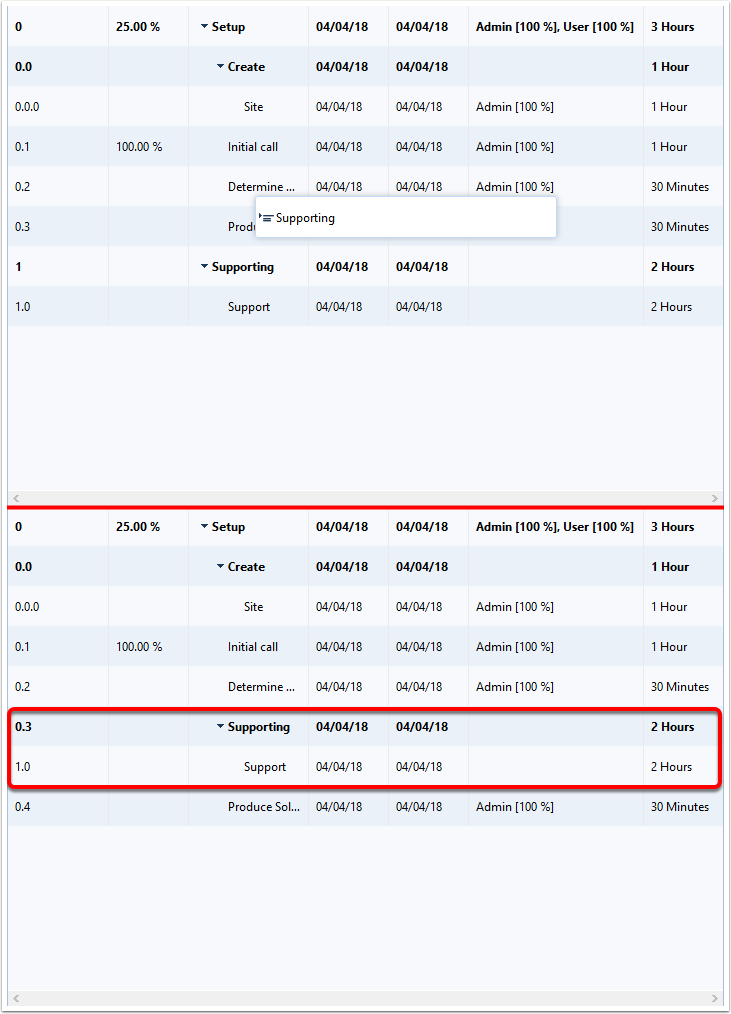
You can click and drag Jobs and Tasks to reorder them and to change their parent. Here we are dragging the Supporting job. By releasing the mouse at this point, we will have made it a Child Job of the Setup job.
Notice that it also moves the Job's Tasks.
Clicking & Dragging 2
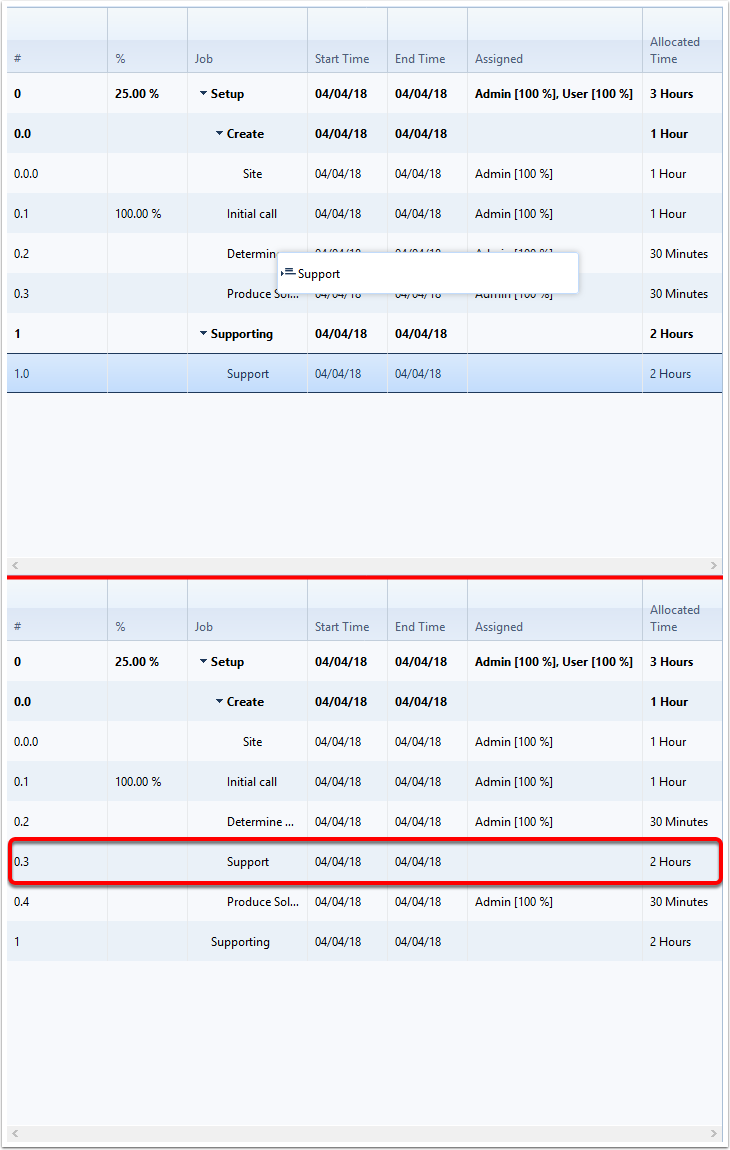
You are not able to drag a task outside of a Job - all Tasks must be under a job, though the Job they are under can change. Here we are dragging the Support task. By releasing the mouse at this point, we will have made it a task under the Setup job.
The Job & Task Chart
The pane on the right shows the visual representation of time scheduled for the current Project.
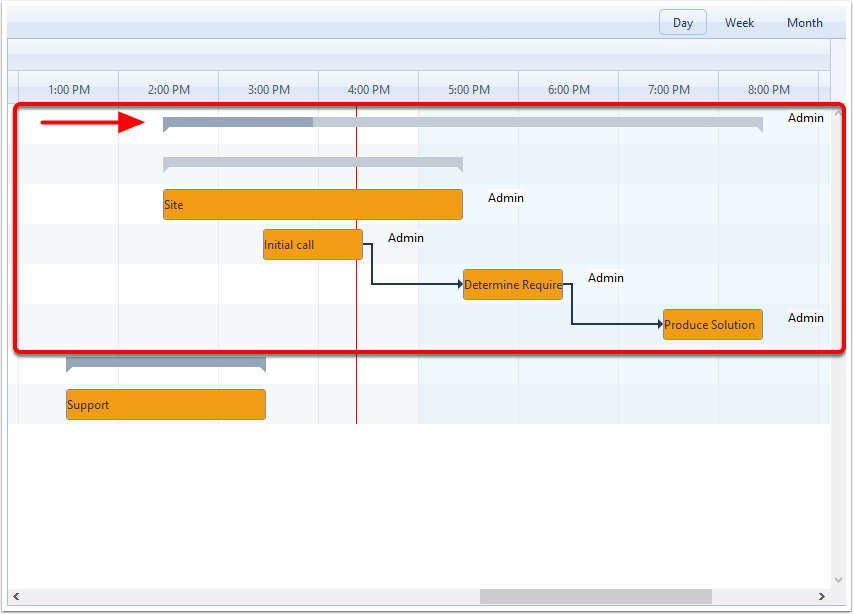
Visible Chart Elements
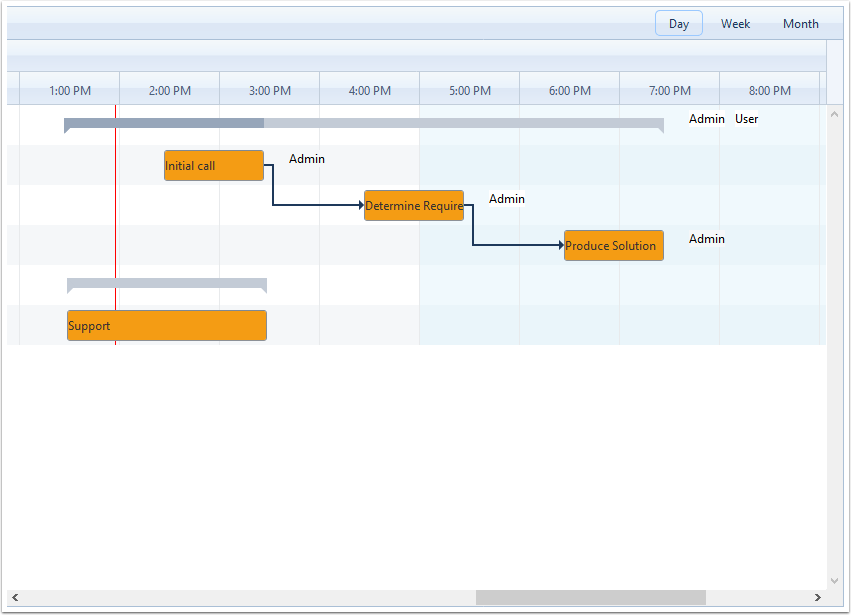
The following elements are visible on the chart:
- The Grey range line shows the scheduled duration of the Job. It acts as a sort of progress bar - as the job gets completed, the line becomes a darker grey from left to right.
- The names of the users assigned to a particular Job or Task.
- The orange bar shows the scheduled duration of the Task.
- The red vertical line shows the current time. Depending on when the Project is scheduled for this may not be visible.
- The arrows between tasks represent dependencies. Here the Determine Requirements task is dependent on the completion of the Initial Call task, and the Produce Solution task is dependent on the completion of the Determine Requirements task. There will be more information on dependencies later in the article.
Switching View Layout Types
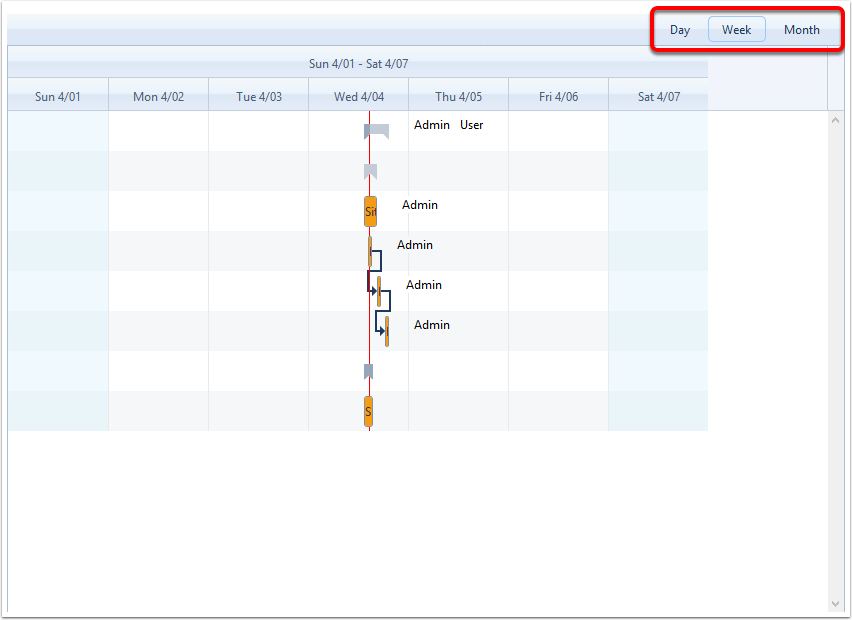
The Gantt can display information for a single day, the current week or the current month. By using the Day, Week and Month options at the top right, you can customise the current layout of the Gantt.
One of these views may work best depending on the scheduled duration of the Project. For example, the current Project only has Jobs with a short duration, which means it may not be as useful to look at it through the Week layout, as shown below.
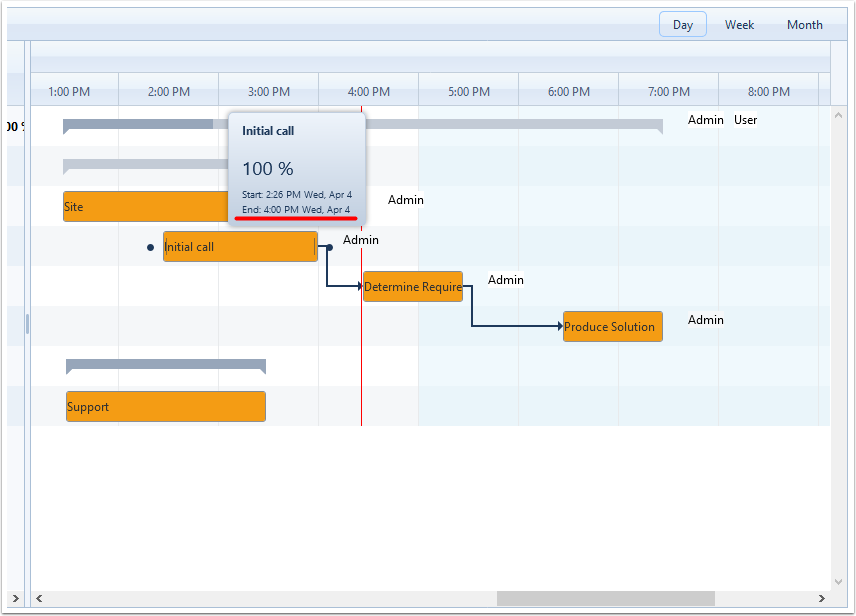
Hovering Over a Job or a Task
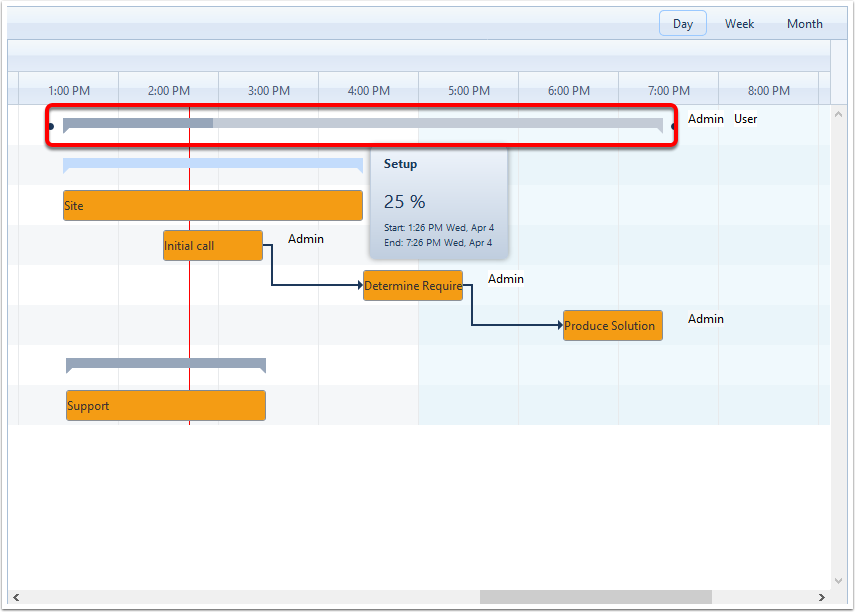
By hovering the mouse cursor over a Job or a Task in the Chart, you'll get a popup containing more information about the Job or Task. The information in this popup is:
- the item's name
- it's Completion Percentage, and
- its scheduled start and end dates.
The Right Click Menu - Jobs & Tasks
The same right-click menus that were available in the Job & Task List are also available in the Chart - please see the menu information above in the Job & Task List section for more information.

Clicking & Dragging
Clicking and dragging on any item in the chart will allow you to adjust its scheduled time. this may also cause other items in the chart to change their scheduled times - for example, changing the scheduled time of the first Task on a Job (in terms of its Scheduled Start) will also change the scheduled start time of the Job to match
In the image above, the Site task is the only task in the Create job, which is the first scheduled item in the Setup job. By moving the Setup task one time slot to the right, we also move the Create job's scheduled time and the Setup job's scheduled Start Time.

Clicking & Dragging 2
Clicking and dragging a Job will shift all of the children of that job by the same amount. For example If we shift the Setup job (that's the one at the top spanning the 1pm - 7pm time slots) one slot to the right, all of its children will be adjusted the same.
The Supporting job (at the bottom with the Support task) has not moved since it's not a child on the Setup job.
Clicking & Dragging 3
You can also click and drag the end of a Task to change it's scheduled dates. If we drag the end of the Initial Call task to the right, the task's Scheduled Finish will change, which can be seen if you hover over the task.
Please note that Jobs cannot be dragged in this manner.
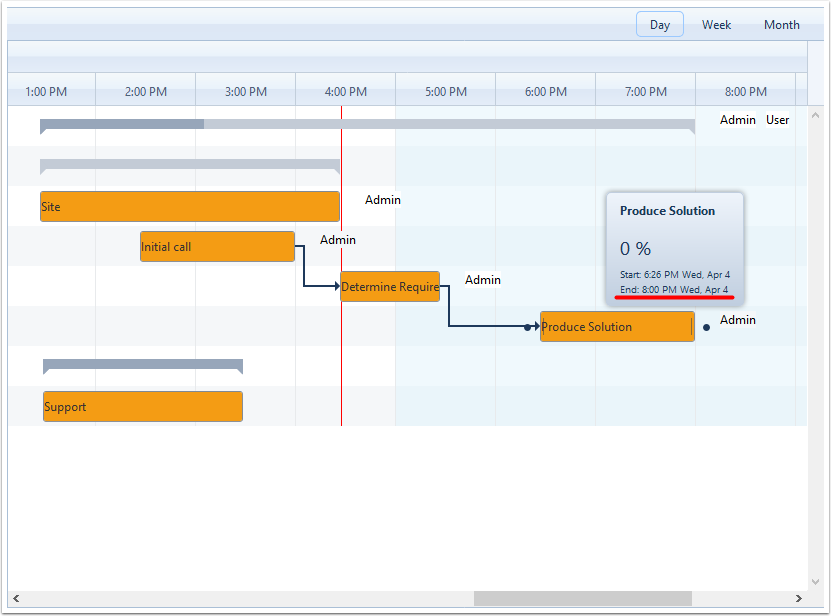
Clicking & Dragging 4
Dragging the end of a task past the Scheduled End of a Job will change the Job's Scheduled End date to match. Here, we've extended the Produce Solution task to 8pm, and the Job has also changed its Scheduled End time.
Dependencies
Dependencies can be set up between tasks and jobs. These signify that a specific task cannot proceed until another has reached a certain point.
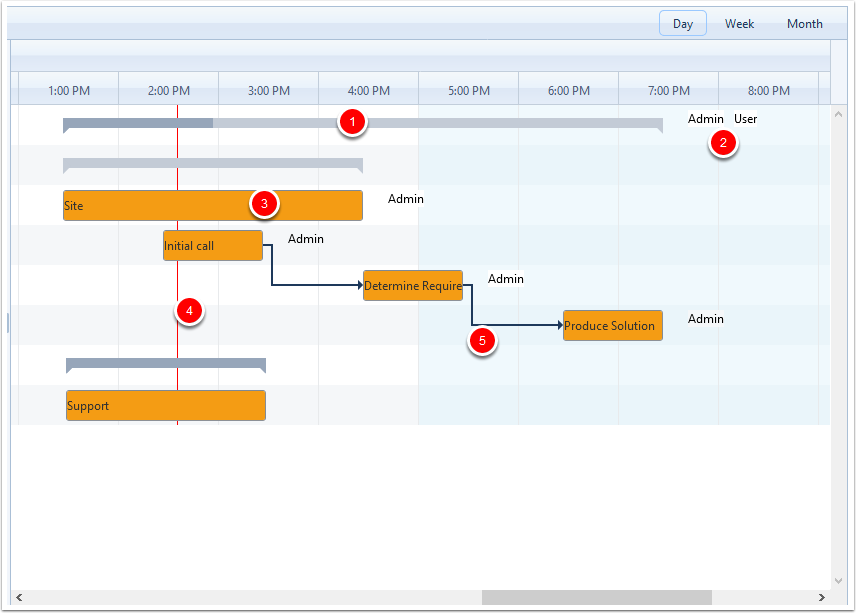
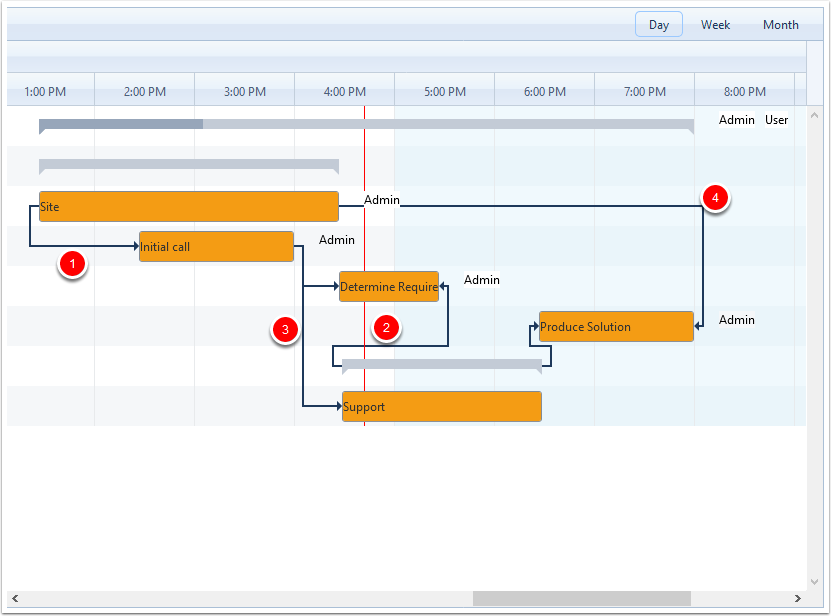
There are four dependency types that can be set up (see the numbered lines in the image below):
- Start to Start (the task cannot be started until its dependency has started)
- Start to Finish (the task cannot be completed until its dependency has started)
- Finish to Start (the task cannot be started until its dependency has been completed)
- Finish to Finish (the task cannot be completed until its dependency has been completed)
Note that a Job can depend on a Task, and a Task may depend on a Job.
You can set up multiple dependencies for a specific task. Below, for example, once the Initial Call task is completed, the Support and Determine Requirements tasks can be started.
Please also be aware that dependencies shown on the Gantt aren't representative of available actions in CreataCRM - in the CRM you are free to start any task and any job at any time. The dependencies shown on the Gantt are a guide only and show the intended flow of a system.
Dependencies 2
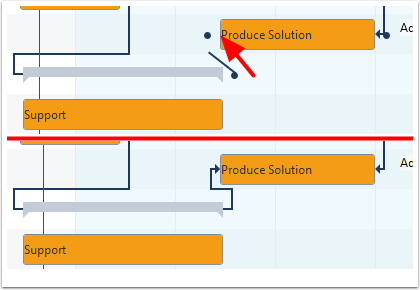
To set up a dependency between two items, briefly hover the mouse over one of them - you should see two small dots appear around the item, one at either end. Click on one of those dots, and drag towards another item.
As you hover over the second item, the same dots will appear. Release the mouse when over one of those dots, and the dependency will be created.
Here we've started the dependency at the end of the Supporting Job, dragging towards the Produce Solution task.
The arrow for the dependency will point to the item where the mouse was released.
Dependencies 3
CreataCRM has the ability to notify the assigned users once a dependency has been completed. We signal our background Workflow service to look at a completed task, find that task's dependencies and send an alert to the assigned users of the next task.
For more information on this please see the Workflow article.
Please contact CreataCRM to ensure the Workflow service has been set up for your site if you intend to make use of this feature.
The New Job Button
Clicking the New Job button automatically creates a new Job and links it to the Project, and also immediately displays the job in the Gantt.

The Export To PDF Button
Clicking the Export to PDF button will download a PDF version of the current Gantt view.

The Pop Out Button
Clicking the Pop Out button opens the Gantt view in a new browser tab.
The Fullscreen button
Clicking the Fullscreen button puts makes the Gantt take up the whole page and puts your web browser into Fullscreen mode.